ArtFrame Kit – Manual
Table of Contents
ArtFrame Kit – ManualTable of ContentsInitial StartupConfigurationUser InterfaceModeLocalRemoteFilesSettingsWiFiPasswordImage Server URLRefresh IntervalSave & RestartSet up your own image serverImage Format (.rawz)Battery ChargingTroubleshootingError MessagesUnexpected BehaviorFirmware UpdateDriver InstallationWindowsMacLinuxFlashing the FirmwareReset to Factory SettingsResetNotes
Initial Startup
As soon as the assembly is completed, your device can be put into operation. The device's battery is already pre-charged upon delivery. However, to ensure maximum runtime, the battery should be recharged via the micro USB port on the motherboard, which can be accessed via the back of the device. A full charge can take up to 5 hours.
| ⓘ Important Note |
|---|
| The device does not have a battery charge indicator. When the battery is low, the images are only built up incompletely. You should charge the battery at the latest then. |
Some images are already pre-installed at delivery. The time between automatic image changes is configurable and factory set to one hour. Most of the time your ArtFrame will spend in sleep mode to save the battery. Then the status LED is off. If it is on, the device is active.
If you now press the LED button briefly, the status LED will start to light up. After a few seconds, the image will change, after which the status LED will go out.
If, on the other hand, you press the LED button for longer than four seconds, the configuration mode starts instead, which is explained in the following chapter. If you now press the LED button a second time, the configuration mode is ended and a new image is displayed. The device now switches to the idle state and the status LED goes out.
Configuration
To adjust the settings of your device, press and hold the LED button on the bottom of the device for approx. 4 seconds. The status LED immediately starts to light up and the words CONFIGURATION MODE appear on the display. Follow the instructions on the display.
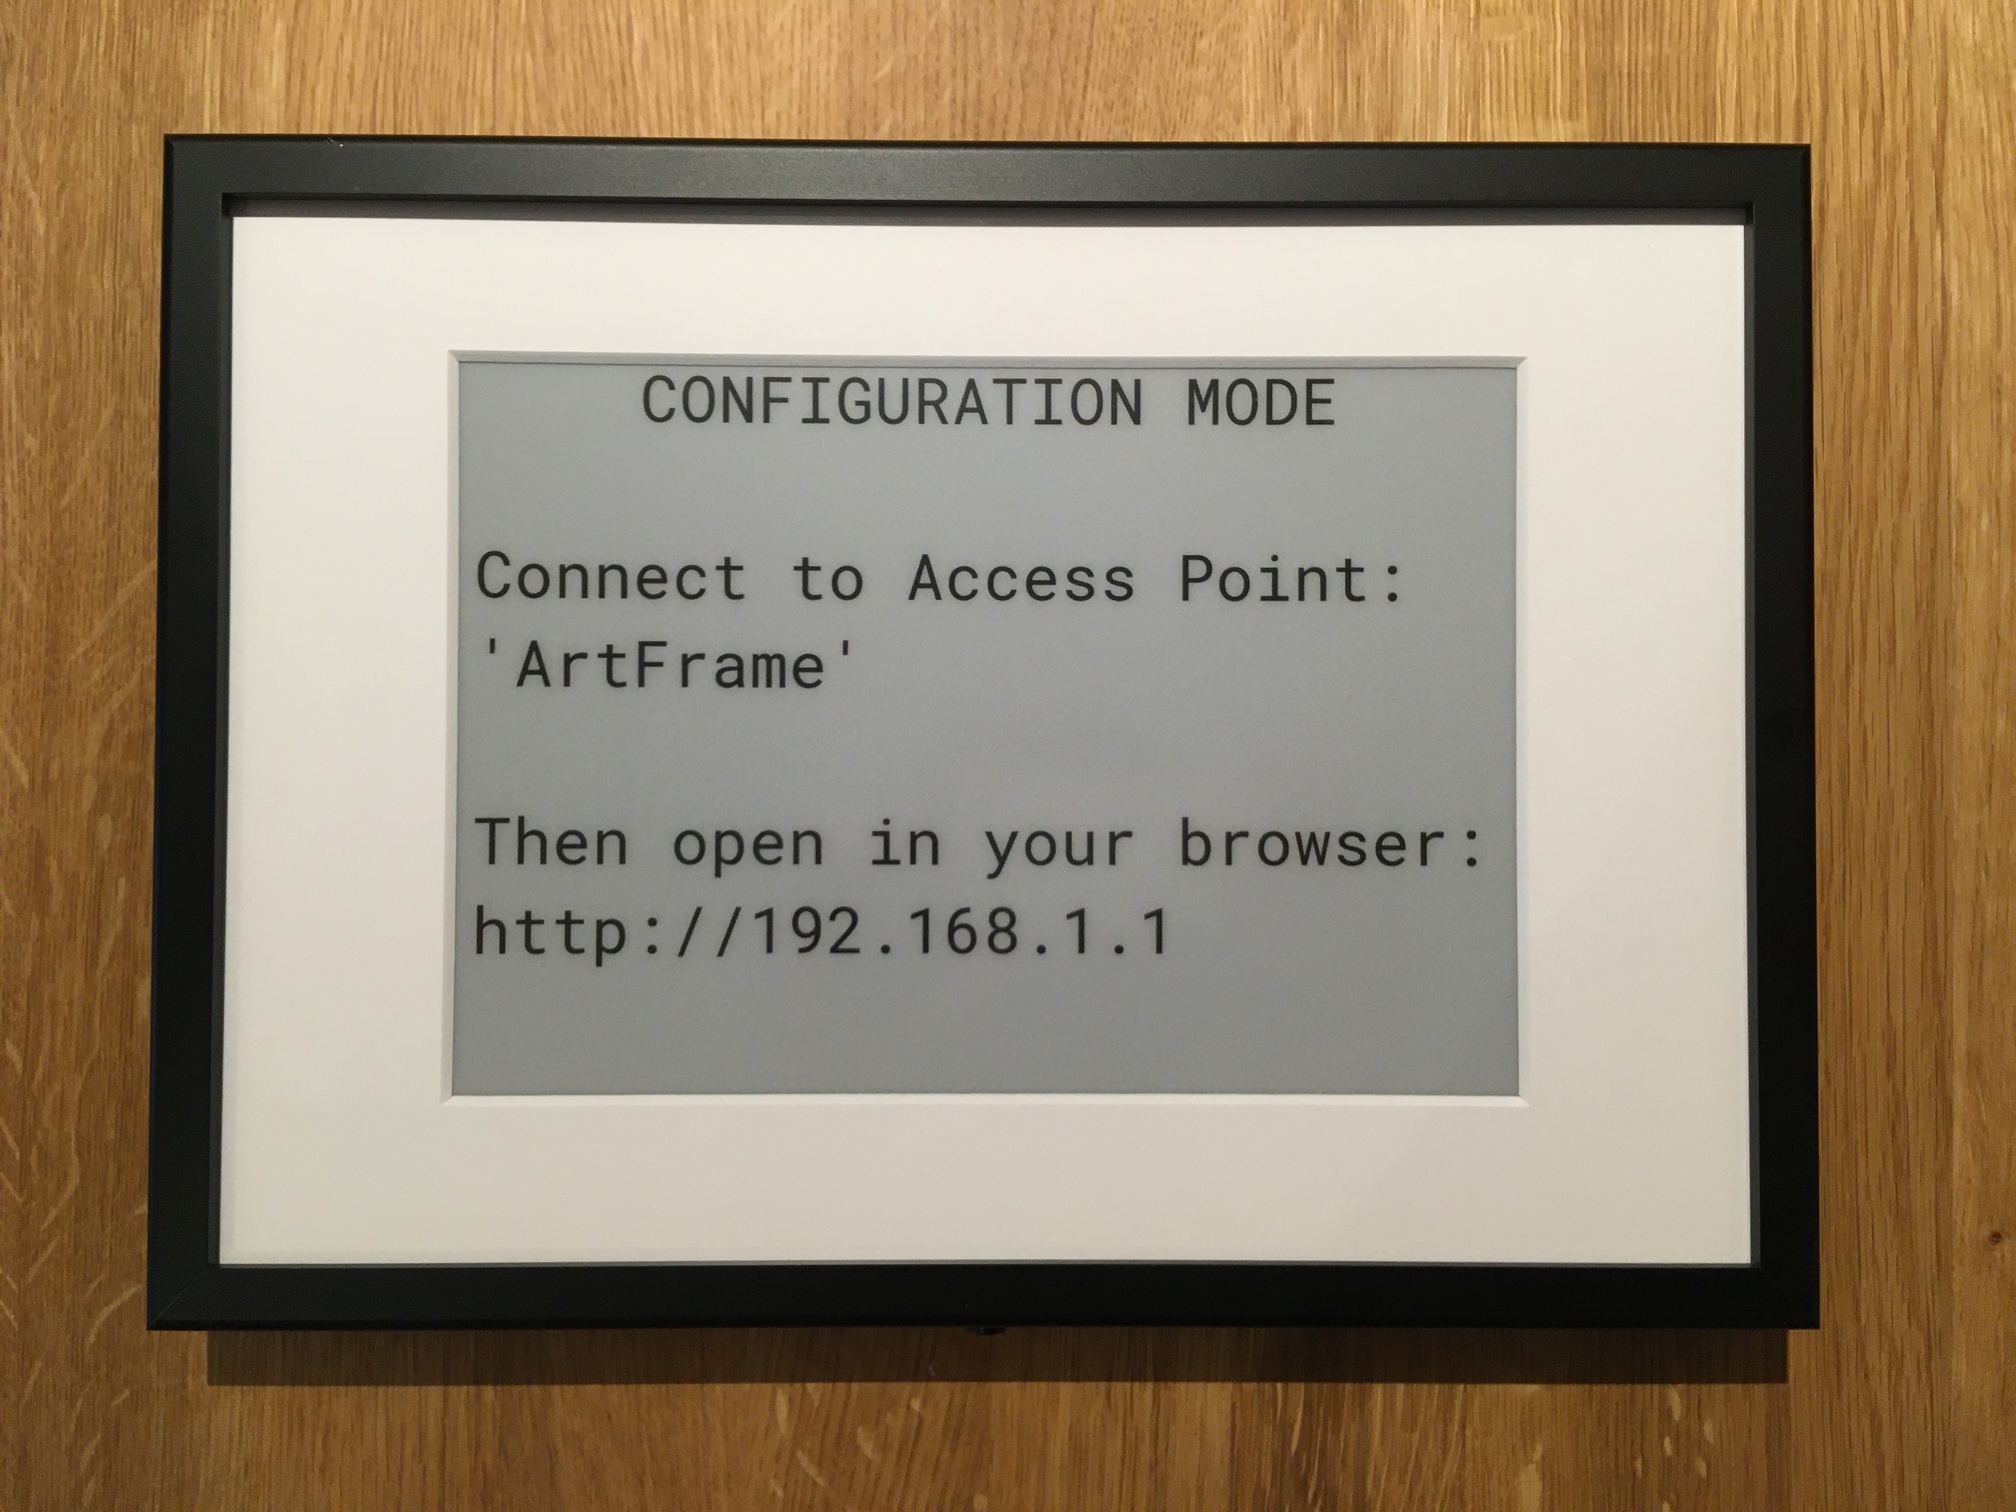
If you are doing the configuration for the first time, a WiFi hotspot with the name ArtFrame will now be created. Connect your smartphone or laptop to this WiFi and then open the URL http://192.168.1.1 in the web browser.
| ⓘ Important note |
|---|
| On some Android devices, opening the URL only works when the mobile data connection is turned off. |
If you have already stored WiFi and Password in the settings, the device will first try to log into that WiFi and provide the configuration interface there. This way you can configure the device via your home network. The URL to be opened in the browser is different then. However, if the connection attempt fails, the WiFi hotspot described at the beginning is created instead.
| ⓘ Important Note |
|---|
| The device has an increased power requirement during configuration mode. To achieve the maximum runtime, you can charge the device via the micro USB port on the back after configuration. |
User Interface
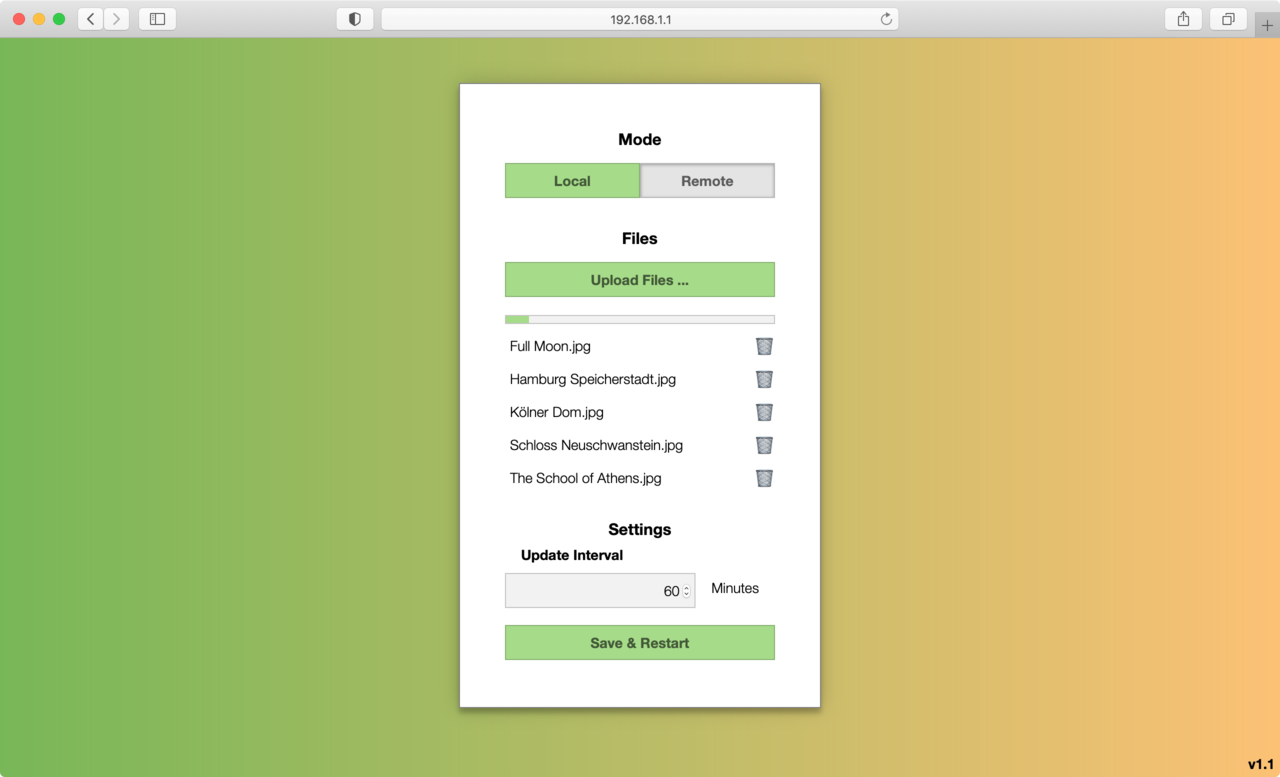
The behavior of your ArtFrame can be customized via the configuration interface. In addition, the version of the currently installed software is displayed in the lower right corner. The various settings are explained below.
Mode
This switch can be used to select between Local and Remote mode. Depending on the selection, various specific settings are visible.
Local
In Local mode, the ArtFrame will display images from the local memory of the device.
Remote
In Remote mode, the images are loaded and displayed via the WiFi.
| ⓘ Important note |
|---|
| In Remote mode, image switching takes a bit more time than in Local mode. Thus, the battery life is slightly reduced in this mode. |
Files
These settings are only relevant for the Local mode. Here you can manage the images stored on your ArtFrame. A status bar indicates the used storage space. Below there is a list of the images stored on your ArtFrame. An image can be deleted using the Trash icon. Using the Upload Files ... button, images can be selected and transferred to the ArtFrame. For each selected image a preview is displayed where contrast and brightness can be adjusted. A dashed line indicates the image section to be transferred. It can be moved and resized.
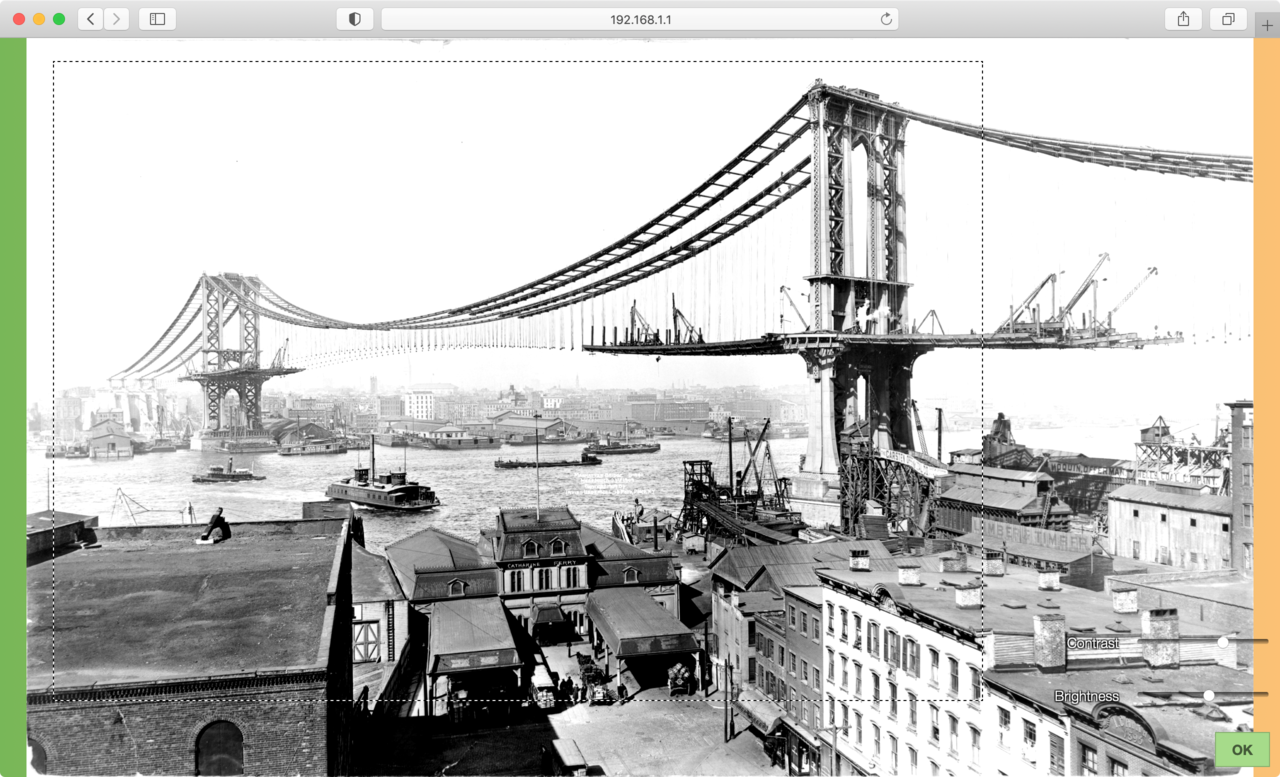
The adjustments are confirmed with the OK button. The image is now processed and transferred.
Settings
General settings can be changed here. Some of them are only relevant in Remote mode.
WiFi
If your ArtFrame is to be operated in Remote mode, the WiFi via which the connection is to be established can be entered here. The WiFi must transmit via the 2.4 GHz band. 5 GHz is not supported.
| ⓘ Note |
|---|
| If this setting is not empty, your ArtFrame will first try to dial into the stored WiFi when starting the configuration mode. This way you can directly access the configuration interface within this WiFi. If the connection fails, a separate WiFi hotspot with the name ArtFrame will be started instead. |
Password
If the WiFi to which your ArtFrame is to connect is password protected, the password must be entered here so that the connection can be established.
Image Server URL
If your ArtFrame is to be operated in Remote mode, the URL from which the images are to be obtained can be entered here. For testing the URL http://framelabs.eu:8090/ is preset.
| ⓘ Note |
|---|
| The URL must consist of protocol, domain name, optional port, and a path. The path must not be empty. Therefore, in the example above, the / at the end must not be omitted. |
How to start up a self-hosted Image Server is described in the following chapter.
Refresh Interval
This setting determines how much time should elapse between image changes. The time interval can be set to the minute. We recommend an interval of one hour.
| ⓘ Note |
|---|
| The longer the interval, the longer the battery will last until it needs to be recharged. |
Save & Restart
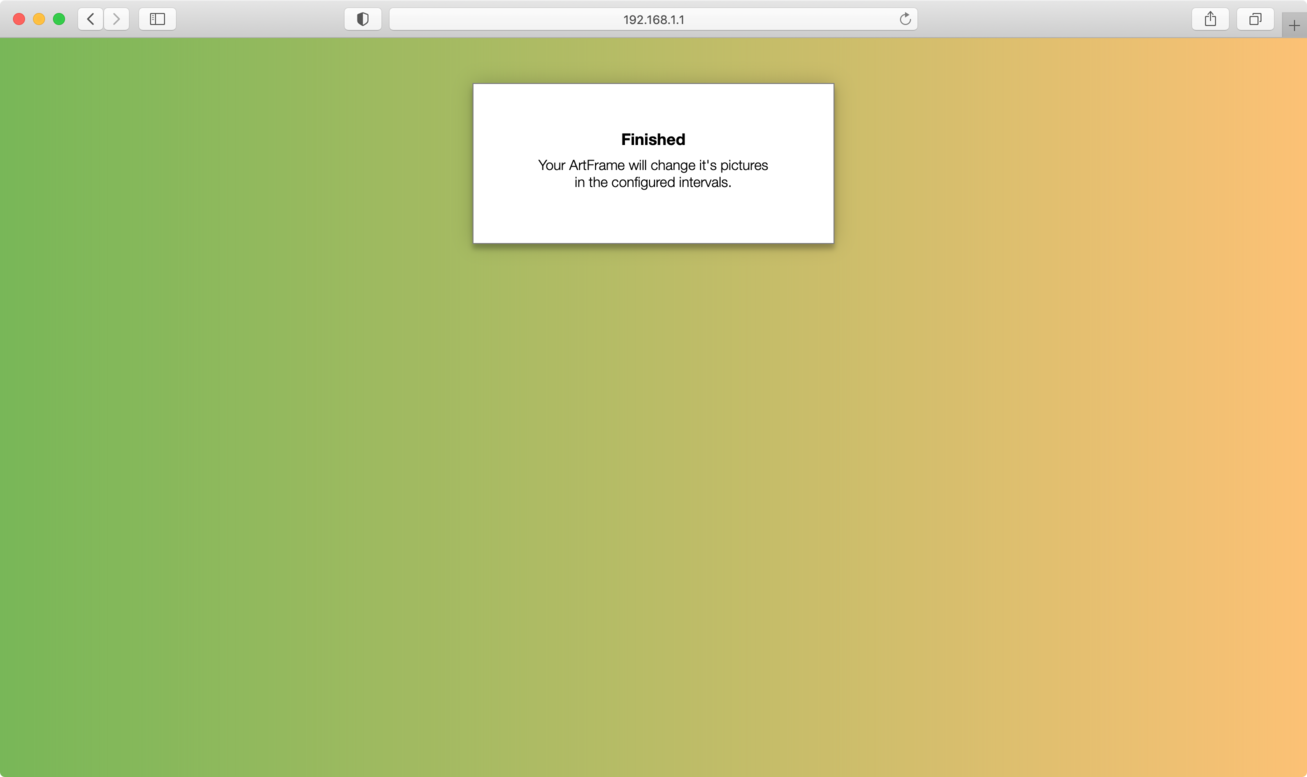
When you press this button, the settings are saved. The device exits the configuration mode, performs a picture change and enters sleep mode.
Set up your own image server
Your ArtFrame has the ability to download and display images over WiFi.
The software image_server.py is a Python program that serves images via an HTTP interface. For each request a random image is selected.
./image_server.py --port 8090 [path to image folder]To display the images on your ArtFrame, it must be set to Remote mode, WiFi and Password must be entered correctly and the Image Server URL must be set to http://[IP address of server]:8090/.
| ⓘ Note |
|---|
| A preprocessed version of the images will be served, adapted to the target device by cropping, resizing, conversion to grayscale and dithering. |
Image Format (.rawz)
The .rawz image format is a zlib-compressed framebuffer with 4 bit per pixel, starting line by line from the top left. Every byte contains two pixels, with the left pixel as the less significant bits. A sample implementation showcasing the conversion from and to the format can be found at https://github.com/framelabs-eu/tools.
Battery Charging
Connect the micro USB port on the back of the device to a USB charger using the USB to micro USB cable. A full charge can take up to five hours. A red LED indicates the ongoing charging process. It is visible through the display and goes out as soon as charging is completed.
Troubleshooting
If problems occur during operation, you can search for possible solutions here.
| ⓘ Note |
|---|
| The e-paper display retains its content even without power. In the event of an error, always check whether the status LED is lit first. Only then are any instructions on the display also up-to-date. |
Error Messages
Error messages that appear on the display or the configuration interface are usually external errors.
| Error Message | Solution |
|---|---|
| Could not connect to WiFi | The device is running in Remote mode but cannot connect to the configured WiFi. Check the saved WiFi and Password and make sure that the WiFi is reachable on the 2.4 GHz band. If this does not remedy the situation, reduce the distance to the WiFi router. |
| Couldn't connect to server | The device is running in Remote mode but cannot receive data. Check the saved Image Server URL. |
| No pictures installed | The device is running in Local mode, but there are no images installed. First load images onto the device. |
| Error: Not enough space | The local storage of your ArtFrame is full. If you want to transfer more images to the device, you must first delete other images from its local storage. |
Unexpected Behavior
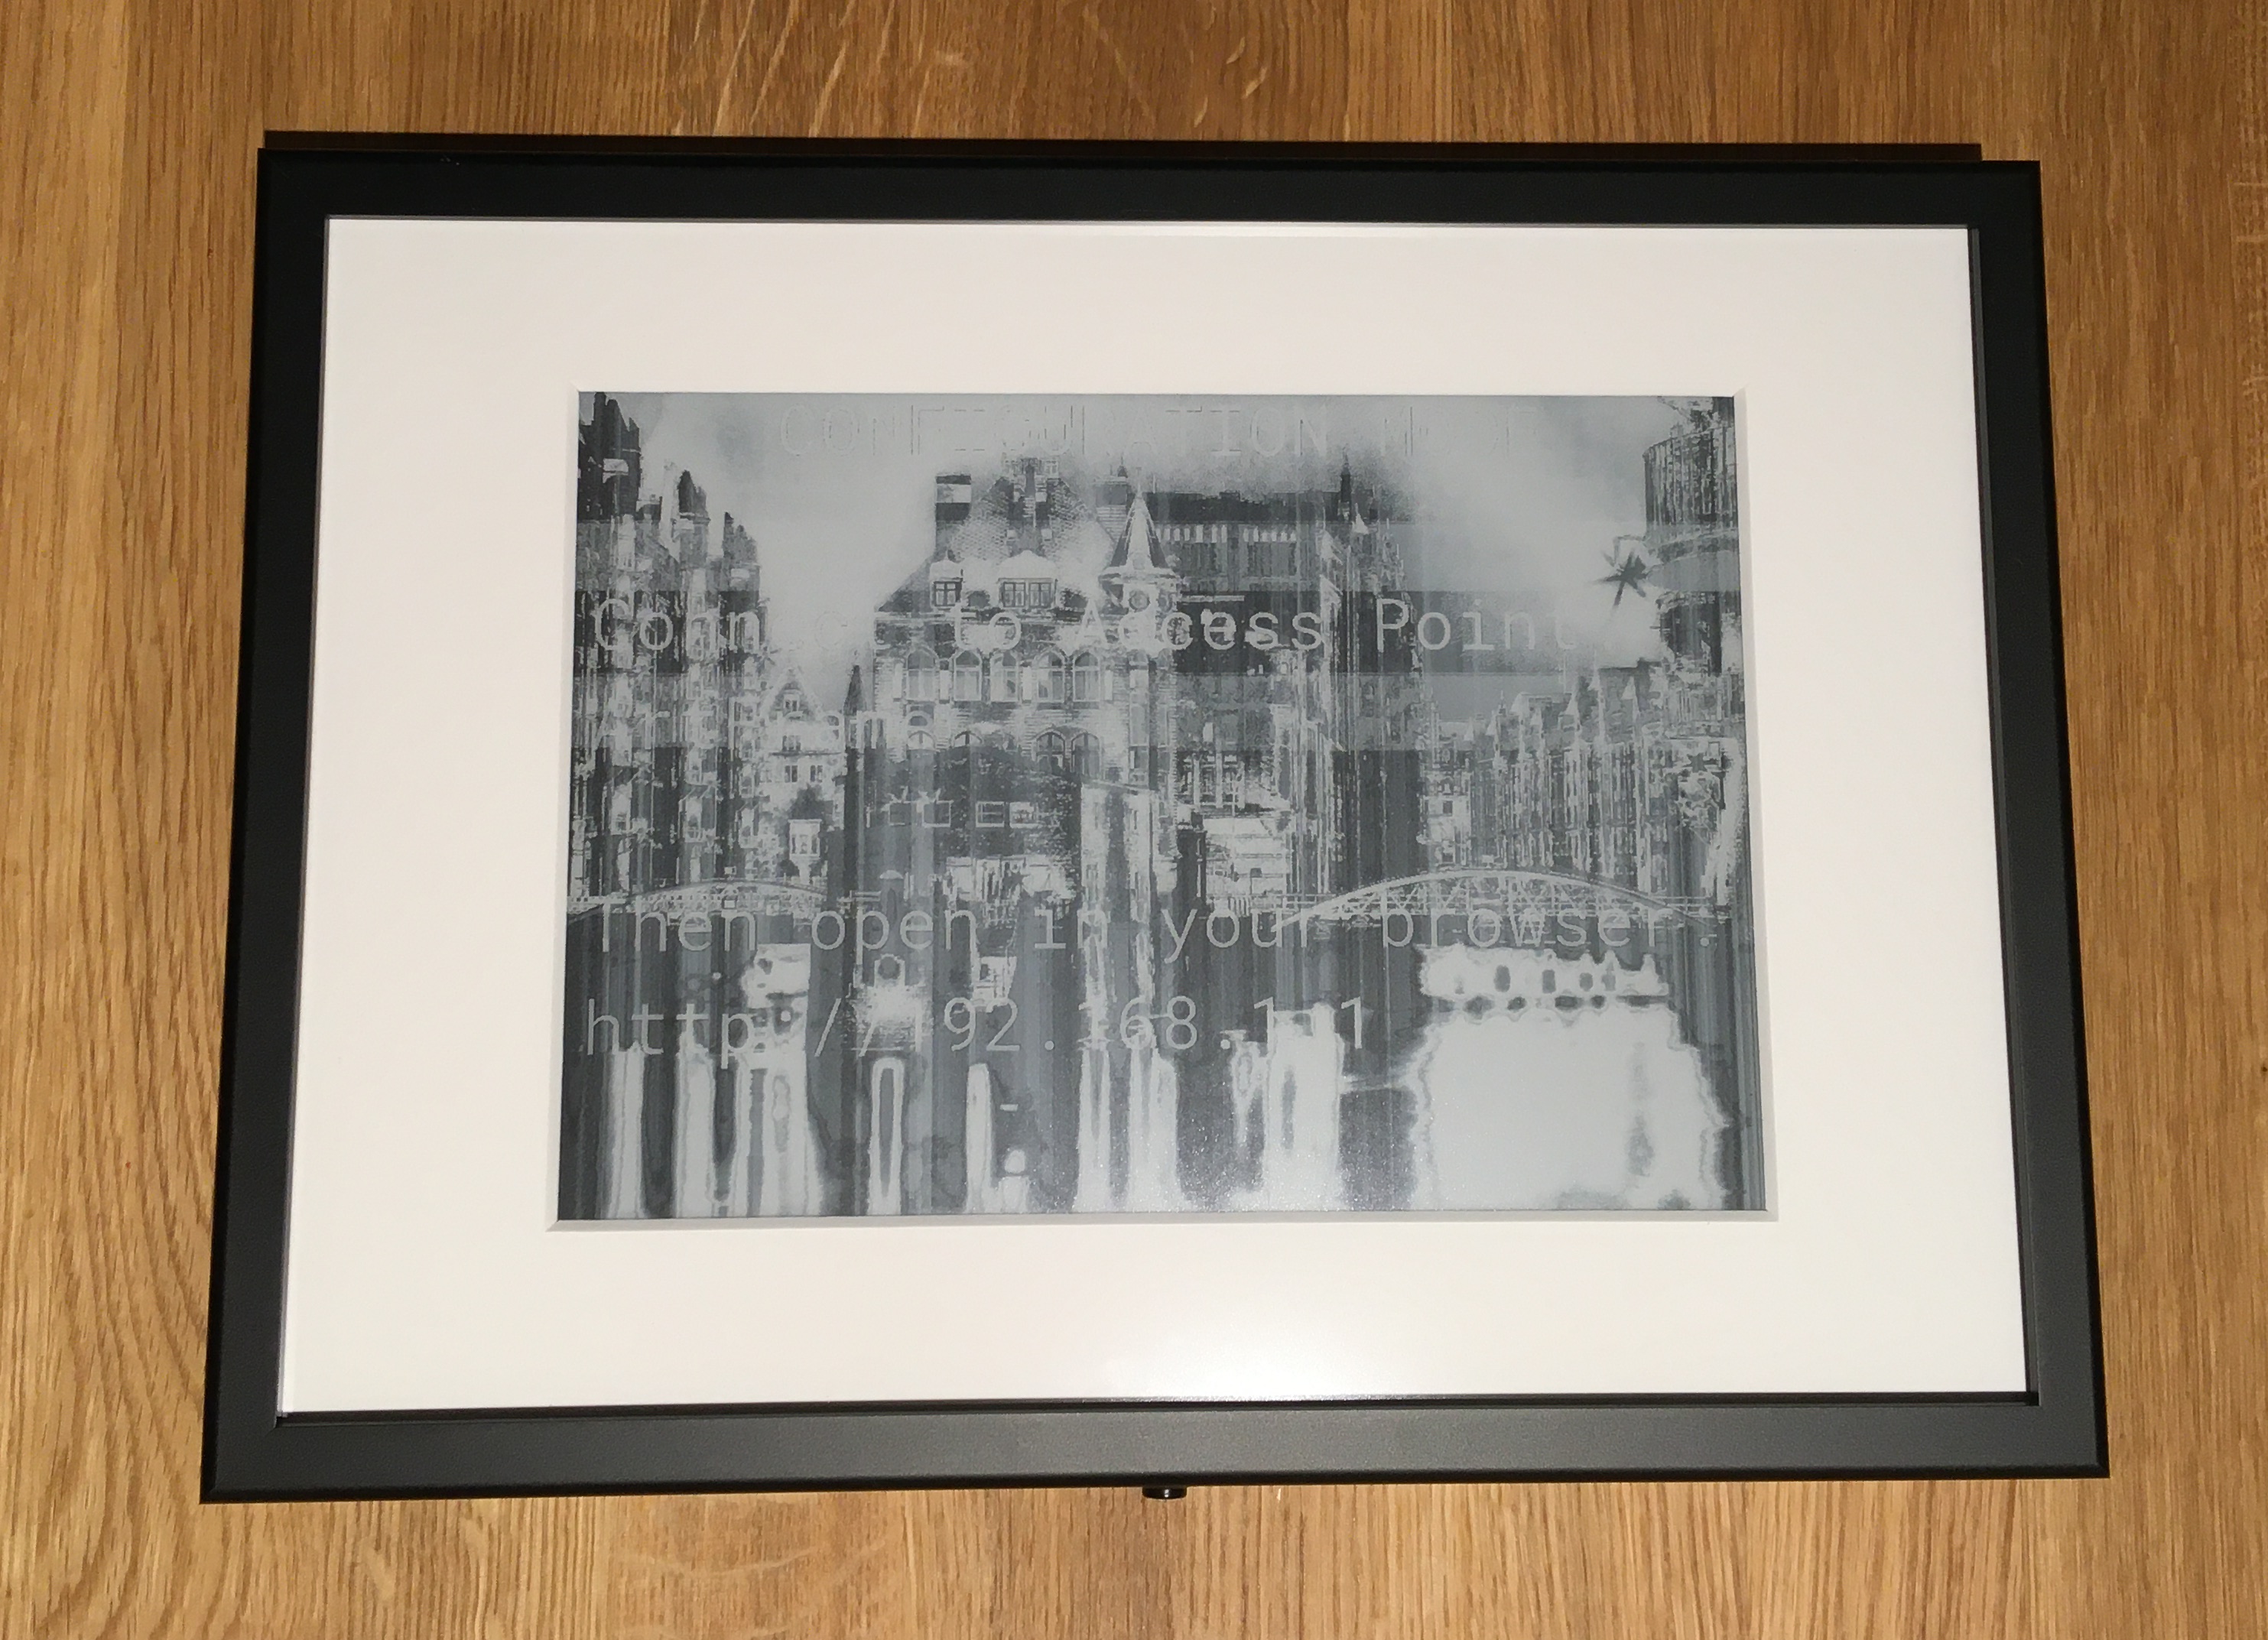
If unexpected behavior occurs during operation, but no error message appears, it is often an error that is caused by the battery level being too low. The following error pattern is typical for this: The new image could no longer be built up completely. In such a case, the battery should definitely be fully recharged.
Further problems and possible solutions are listed below.
| Problem Description | Solution |
|---|---|
| The configuration interface cannot be reached. | Check whether the status LED is lit. If this is not the case, the battery must be charged. |
| Check if your smartphone or laptop is connected to the WiFi that is mentioned on the display. | |
| If you are using an Android smartphone, disconnect the mobile data connection and then try again. | |
| Try to establish a connection with another device. | |
| Check whether the ArtFrame reacts when you press the LED button briefly. | |
| An image cannot be uploaded. | With very large images in connection with old smartphones, the phone can be overwhelmed when processing. Try again with a different browser, smaller image or with a smartphone with more RAM. |
| Images show artifacts, look incomplete, or are not fully displayed. | Charge the battery. |
| The status LED does not light up after the LED button has been pressed. | Charge the battery. |
| The status LED flashes once when you press the LED button and then goes out. | There is an error with the communication to the display driver board. Charge the battery. If this does not solve the problem, check the cabling. |
| The status LED flashes twice when you press the LED button and then goes out. | There is an error with the initialization of the display driver board. Charge the battery. If this does not solve the problem, check the cabling. |
| The status LED flashes three times when you press the LED button and then goes out. | There is an error with the initialization of the display driver board. Charge the battery. If this does not solve the problem, check the cabling. |
| The status LED does not light up when you press the LED button. | Charge the battery. If this does not solve the problem, check the cabling. |
| The device no longer responds, but the status LED is lit. | Perform a reset. |
Firmware Update
New firmware versions can be found in the support area at https://framelabs.eu/support. Download the latest version for your ArtFrame. Connect your ArtFrame to your computer using the USB to Micro USB cable.
Driver Installation
| ⓘ Note |
|---|
| Only necessary for ArtFrames with a Micro-USB connector. Devices with USB-C don't need an additional driver. |
To update the firmware you need the driver for the serial-to-USB converter CH340 and the esptool.py.
Windows
CH340 driver: https://cdn.sparkfun.com/assets/learn_tutorials/8/4/4/CH341SER.EXE
esptool.py: https://github.com/espressif/esptool
Mac
The CH340 driver is preinstalled on macOS Mojave 10.14 and newer.
A third-party driver for older macOS installations exists.
xxxxxxxxxxbrew tap homebrew/homebrew-cask-driversbrew install wch-ch34x-usb-serial-driverbrew install esptoolLinux
The CH340 driver is pre-installed in most distributions.
xxxxxxxxxxpip install esptoolFlashing the Firmware
xxxxxxxxxxesptool.py --baud 2000000 write_flash 0x10000 [Path to Firmware.bin]Reset to Factory Settings
The settings of your ArtFrame can be cleared without affecting the picture storage.
xxxxxxxxxxesptool.py --baud 2000000 erase_region 0x9000 0x6000The picture storage can be cleared separately.
xxxxxxxxxxesptool.py --baud 2000000 erase_region 0x151000 0xeaf000The initial startup after clearing the picture storage will take around 15 seconds.
Reset
If an error occurs where the Status LED is permanently lit and your ArtFrame cannot be turned off, you can restart the software.
xxxxxxxxxxesptool.py run| ⓘ Note |
|---|
| Alternatively, a reset can be performed by disconnecting and reconnecting the battery wire (white two-pole connector) from the mainboard. |
Notes
Use a damp cloth to clean the device. Make sure that no moisture gets inside the device or onto electrical components.
Do not expose the device to temperatures below -10°C or above 40°C.
Do not operate the device in humidity above 90%.
Do not subject the device to hard impacts.